Thursday 11 July 2013

Configuration/Troubleshooting the setup of Controller and Load Generator Machines over a firewall


General Firewall setup:The MI Listener can be decided by selection through Admin Site in Performance Center. This selection does not need to be changed generally.


Note: If Controller and MI Listener are on different machines, then port 50500 needs to be opened between Controller and MI Listener machines.
Steps to setup monitor/running Vuser over firewall:General Setup steps:Shut down LoadRunner programs (controller, agent…) before the setup. For this, you may need to kill processes magentservice.exe and wlrun.exe through Task Manager -> Processes (as shown below).


Setup on Over the Firewall Agent (Load Generator machine):
a. Go to agent machine (Load Generator machine).
b. Click Start –> Programs -> Mercury Performance Center -> Advanced Settings -> Agent Configuration


c. Check the options Enable Firewall Agent and Enable Terminal Services.


d. Click Settings button.


i. Set MI Listener Name to IP of MI listener machine.
ii. Set Local Machine Key to a symbolic identifier. For example, uap058_ofw.
e. To start the Performance Center agent as service, go to Command prompt and go to F:Program FilesMercuryPerformance Centerlaunch_servicebin folder in Load Generator machine (the drive may be different depending on, in which drive the Mercury Performance Center was installed. Now, run following commands in Command prompt.

To stop LoadRunner agent as service:
magentservice.exe – remove
To start LoadRunner agent as service:

magentservice.exe – install

To stop LoadRunner agent as process:

magentproc.exe – remove

To start LoadRunner agent as process:

magentproc.exe – install

Note:(1) Make sure that Performance Center Agent is running by "Local System Account" (select the radio button as shown below after going to Start -> Settings -> Control Panel -> Administrative Tools -> Services -> Right Click on “Performance Center Agent” -> Click on “Log On” and then stop/start the service again from there).


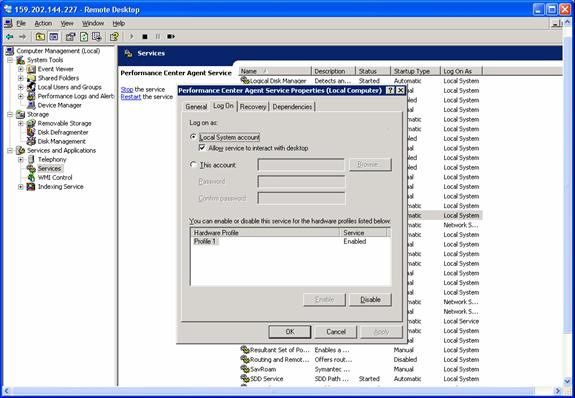
(2) Make sure that the Performance Center Agent runs as Service only, so that once you logout of the Load generator machine, the LoadRunner Agent should still continue running. Also, it should be set to run as “Automatic”, so that when Load Generator machine goes down, then the Performance Center Agent should run automatically, once the machine is up. This can be verified by checking “Performance Center Agent Service” in Start -> Settings -> Control Panel -> Administrative Tools -> Services. It also shows whether the Agent Service is started/running. An alternative way to see the Service is through right click on My Computer -> Manage -> Services and Applications -> Services.


(3) The Performance Center Agent service must be running in Controller machine

too. Go to Controller machine and perform above step (e) to make sure that the

agent is running.


(4) When the Performance Center Agent Service starts as process on Controller

machine, an icon of Performance Center Agent will show up in Tray bar. To see

the Agent Run log, you can right click this icon and click “View Agent log”.

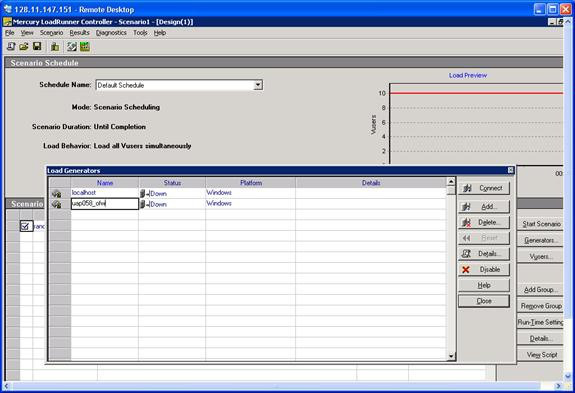
2. Setup on Controller machine:

a. Go to controller machine and launch the controller for a script.

b. Add a new Load Generator (Click Generators -> Add). Provide name as the local machine key name provided in the Agent Configuration in the Load Generator machine (for example: uap058_ofw).


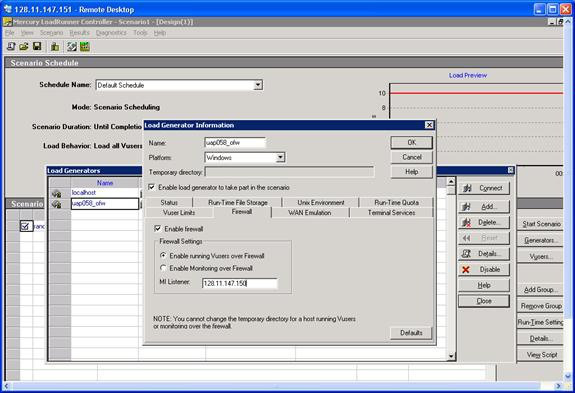
c. Highlight the agent and click on Details and go to the Firewall tab. You will see the following ‘Load Generator Information’ window:


f. For Running Vuser Over Firewall:
· Check the check box for ‘Enable firewall’

· Check the button for ‘Enable running Vuser over Firewall’

· On the field for MI Listener, enter the IP address of the Controller that was configured in the Load Generator machine (step 1.(d) above).

g. Start LoadRunner agent on both ends (controller and load generator), using the commands in Step 1.(e) above.

h. Highlight the Agent and Click “Connect”.

Known problems and limitation:

You need to open up port 443 (bi-directional) for allowing incoming and outgoing communication on MI Listener machine.
You need to open up port 50500 between Controller and MI Listener, if the Controller and MI Listener machines are different.

Troubleshooting tips for connection issues between the MI Listener and the Agent machine

· Make sure that you do not have any Web Servers, like IIS or Oracle HTTP servers running on both the machines. These servers uses/block port 443 and will cause a problem on launching LoadRunner agent.

· To verify that port 443 is open to allow communication between these machines, go to the agent (Load Generator) machine, launch DOS prompt and type in the command ‘telnet 443’ . For example,

telnet 128.11.147.150 443

If port 443 is open then you should see a connected telnet session window. If you do not see this, check with your Network admin/Firewall group to ensure that port 443 is open or not.

· The “Performance Center Agent Service” must be running either by ‘System User account’ or by a user who has administrative privileges on this machine (Username and password details need to be provided). These details can be found by right click on the service in Start -> Settings -> Control Panel -> Administrative Tools -> Services -> Performance Center Agent Service.

Additional tips:

· If you see the “Page can not be displayed” error in Performance Center web page(s), then login to Performance Center Web Server box and make sure that “Apache Tomcat” service is started (as shown below).


Question – The default user id named ‘admin’ was configured to login to Performance center Load test. It is not working now.

A.1 – The first step is to make sure that the user name and password is written correctly. The password is case-sensitive.

The default administrator account is Admin, Admin for the user and password.

A.2 – The second step perform in case that the first is not working, is the following:

• Open Documents And SettingsAll UsersApplication DataMicrosoftCryptoRSAMachineKeys and delete the entry that begins with f9416f003254e610da1f9bad8e4c383_.

• Restart IIS. Choose Start > Programs > Administrative Tools > Services. Select IIS Admin Service and click Restart Service.

RDP Portocol in loadrunner Recording Tips

The Microsoft Remote Desktop Protocol (RDP) allows users to connect to a remote computer. For example, you can use RDP to connect to a central and powerful server for working on specific business applications or graphic terminals. This provides the user with the same look and feel as if they are working on a standalone PC.

Note: RDP versions 5.1 and later have an Experience tab that allows you to set various options. This tab is not supported by VuGen recording. All options are set to the ON position.

RDP Recording Tips
When recording a script, be sure to follow these guidelines in order to create an effective script.

Single vs. Multi-Protocol Scripts
When creating a new script, you may create a single protocol or multi-protocol script. For example, to record both RDP traffic and Web responses, create a multi-protocol script for RDP and Web to enable the
recording of both protocols.

Record into Appropriate Sections
Record the connection process into the vuser_init section, and the closing process into the vuser_end section. This will prevent you from performing iterations on the connecting and disconnecting.

Run a Clean Session
When recording a session, make sure to perform the complete business process, starting with the connection and ending with the cleanup. End your session at a point from where you could start the entire process from
the beginning. Do not leave any client or application windows open. You should also configure your terminal server to end disconnected sessions. Select Administrative Tools > Terminal Services Configuration >
Connection Properties > Sessions > Override User Settings and set the server to end disconnected sessions.

Explicit Clicks
When opening expanded menu options, click explicitly on each option—do not depend on the expanding menu. For example, when choosing Start > Programs > Microsoft Word, be sure to click on the word Programs.

How to Install / Uninstall the RDP Agent in RDP Protocol in load runner

The installation file for the Agent for Microsoft Terminal Server is located on the product installation disk, under the Additional Components\ Agent for Microsoft Terminal Server directory. Note that the agent should only be installed on your RDP server machine, not Load Generator machines .If you are upgrading the agent, make sure to uninstall the previous version before installing the next one (see uninstall instructions below).

Install the RDP Agent:

1 If your server requires administrator permissions to install software, log in as an administrator to the server.

2 If you are using a Remote Desktop connection (RDP) to install the agent onto a machine running Windows 2003,
 run the following command on the target machine before starting the installation:
Change user /install

3 Locate the installation file, Setup.exe, on the LoadRunner DVD in the Additional Components\ Agent for Microsoft Terminal Server directory.


4 Follow the installation wizard to completion. Change user /install

Note: To use the agent, you must set the recording options before recording a Vuser script. In the Start Recording dialog box, click Options. In the Advanced Code Generation node, check Use RDP Agent.


Uninstall the RDP Agent

1 If your server requires administrator privileges to remove software, log in as an administrator to the server.
2 Select Control Panel > Add/Remove Programs > HP Software Agent for Microsoft Terminal Server and click Change/Remove.

LDAP Protocol in Load runner |

LDAP (Lightweight Directory Access Protocol) is a protocol used for accessing and maintaining directory information services over an IP network. LDAP, the Lightweight Directory Access Protocol, is a protocol used to access a directory listing. The LDAP directory is composed of many LDAP entries. Each LDAP entry is a collection of attributes with a name, called a distinguished name (DN). In LoadRunner, you can simulate LDAP traffic using the LDAP virtual user protocol to test the performance and scalability of LDAP-based applications. LDAP directory entries are arranged in a hierarchical structure that reflects political, geographic, and/or organisational boundaries. Entries representing countries appear at the top of the tree. Below them are entries representing states or national organisations. Below them might be entries representing people, organisational units, printers, documents, or just about anything else.

VuGen records communication over LDAP servers. It creates a script, with functions that emulate your actions. This includes logging in and out of the server, adding and deleting entries, and querying an entry

LDAP Protocol Example Script
All LDAP functions come in pairs—one for global sessions and one where you can indicate a specific session. To apply the action to all sessions, use the version without the ex suffix. To apply the action to a specific session, use the version with the session identifier with the ex suffix. For example, mldap_logon logs on to the LDAP server globally, while mldap_logon_ex logs on to the LDAP server for a specific session.
In the following example, the user logs on to an LDAP server, ldap1. It adds an entry and then renames the OU attribute from Sales to Marketing

Action()
{
    // Logon to the LDAP server
    mldap_logon("Login",
        "URL=ldap://easyloadrunner@ldap1:80",
        LAST);

    // Add an entry for JOJO. 
    mldap_add("LDAP Add",
        "DN=cn=JOJO.K Smith,OU=Sales, DC=com",
        "Name=givenName", "Value=JOJO", ENDITEM,
        "Name=initials", "Value=K", ENDITEM,
        "Name=sn", "Value=Smith", ENDITEM,
        "Name=objectClass", "Value=contact", ENDITEM,
        LAST);

    // Rename JOJO’s OU to Marketing
    mldap_rename("LDAP Rename",
        "DN=CN=JOJO. Smith,OU=Sales,DC=com",
        "NewDN=OU=Marketing",
        LAST);

    // Logout from the LDAP server
    mldap_logoff();

    return 0;
}

Defining Distinguished Name Entries:

In LDAP (Lightweight Directory Access Protocol), objects are referenced by their distinguished name (DN). A DN is a sequence of relative distinguished names (RDNs) separated by commas. Each RDN consists of an attribute with an associated value in the format attribute=value. The attribute names are not case-sensitive. Here are some commonly used RDN attribute types:
  • cn (Common Name): Represents the common name of an object, typically used to identify an entity within a directory.
  • ou (Organizational Unit): Denotes an organizational unit within a directory structure, used for organizing objects hierarchically.
  • dc (Domain Component): Specifies a domain component, often used to define the domain name within the directory hierarchy.
  • o (Organization): Represents an organization or company entity within the directory structure.
  • uid (User ID): Identifies a user within the directory, often used for authentication purposes.
These RDN attribute types help in uniquely identifying and organizing objects within the LDAP directory. When constructing DNs for LDAP operations, it's essential to adhere to the syntax and format specified by the LDAP API to ensure accurate referencing and retrieval of directory entries. By following the LDAP standards and guidelines for constructing DNs, developers can ensure interoperability and compatibility across LDAP-compliant systems. Additionally, proper DN construction facilitates efficient searching, filtering, and manipulation of directory data, enhancing the overall performance and reliability of LDAP-based applications. Therefore, a clear understanding of the LDAP DN structure and attribute types is crucial for effectively managing directory resources and implementing LDAP operations with precision and consistency.

In LDAP (Lightweight Directory Access Protocol), certain characters have special significance and need to be properly escaped when used within distinguished names (DNs) or attribute values. These characters include:

1. Comma (,): Typically used to separate RDN components in a DN. It should be properly escaped if it's part of an attribute value.
2. Plus (+): Often used in attribute values. It should be escaped if used in DNs or filter expressions.
3. Semicolon (;): Sometimes used in attribute values. It should be escaped if used in DNs or filter expressions.
4. Backslash (\): Used as an escape character in LDAP to escape special characters. If a backslash is part of an attribute value, it should be escaped by another backslash (\\).
5. Left Angle Bracket (<) and Right Angle Bracket (>): These characters are not commonly used in DNs but should be escaped if necessary.
6. Double Quote ("): Sometimes used in attribute values. It should be escaped if used in DNs or filter expressions.

To incorporate a reserved character as part of an attribute value in LDAP, you must precede it with an escape character, represented by a backslash (\). Additionally, if an attribute value contains other reserved characters such as the equal sign (=) or non-UTF-8 characters, it should be encoded in hexadecimal format, indicated by a backslash followed by two hex digits. Below are examples of distinguished names (DNs) that include escaped characters:

1. Example of an organizational unit name with an embedded comma:

   OU=Sales\,Marketing,DC=example,DC=com
  
   In this example, the comma within "Sales\,Marketing" is escaped to denote that it is part of the organizational unit name.

2. Example of a value containing a carriage return:
 
   CN=John\0D\0ASmith,OU=Users,DC=example,DC=com

   Here, the carriage return character (represented in hexadecimal as \0D\0A) is escaped to ensure proper interpretation within the attribute value.

By adhering to these encoding and escaping conventions, LDAP clients and servers can accurately handle attribute values containing reserved characters, ensuring data integrity and consistency within the directory service.

LDAP Connection Options:
Controlling your login to the LDAP server is facilitated through the mldap_logon[_ex] function.

When specifying the URL of the LDAP server, you indicate the connection method and provide necessary credentials.

The format for specifying the server's URL is as follows:

ldap[s][username:[password]@][server[:port]]

Below are several examples illustrating connections to LDAP servers:

- ldap://a:b@server.com:389: This syntax connects to the LDAP server on port 389 and subsequently binds with the username "a" and password "b".

- ldap://:@server.com: This configuration connects to the LDAP server on the default unsecured port 389 and performs an anonymous bind.

- ldaps://a:@server.com: This format establishes a connection to the LDAP server on the default secured port 636 and then binds with the username "a".

- ldap://@server.com, ldap://server.com: These variations connect to the LDAP server without performing any binding.

- ldap://a:b@: With this syntax, the connection binds with the username "a" and password "b" on the existing session without reconnection.

- ldap://:@: This setup performs an anonymous bind with a NULL username and password on the existing session without reconnection.

Additional LDAP modes or SSL certificates can be specified using optional arguments such as:

- Mode: Specifies the LDAP call mode (Sync or Async)
- Timeout: Sets the maximum search time for the LDAP server
- Version: Specifies the LDAP protocol version (1, 2, or 3)
- SSLCertDir: Path to the SSL certificates database file (cert8.db)
- SSLKeysDir: Path to the SSL keys database file (key3.db)
- SSLKeyNickname: SSL key nickname in the keys database file
- SSLKeyCertNickname: SSL key's certificate nickname in the certificates database file
- SSLSecModule: Path to the SSL security module file (secmod.db)
- StartTLS: Requires issuing the StartTLS extension's specific command to switch the connection to TLS (SSL) mode

Citrix Protocol in load runner Recording Tips

When recording a script, be sure to follow these guidelines in order to create
an effective script. 

Single vs. Multi-Protocol Scripts
When creating a new script, you may create a single protocol or multi-protocol script. If you plan to record a simple Citrix ICA session, use a single protocol script. When recording an NFUSE Web Access session,
however, you must create a multi-protocol script for Citrix ICA and Web (HTML/HTTP), to enable the recording of both protocols.

Record into Appropriate Sections
Record the connection process into the vuser_init section, and the closing process into the vuser_end section. This will prevent you from performing iterations on the connecting and disconnecting.

Run a Clean Session
When recording a session, make sure to perform the complete business process, starting with the connection and ending with the cleanup. End your session at a point from where you could start the entire process from
the beginning. Do not leave any client or application windows open. 

Explicit Clicks
When opening expanded menu options, click explicitly on each option—do not depend on the expanding menu. For example, when choosing Start > Programs > Microsoft Word, be sure to click on the word Programs.

Do not Resize Windows
Although VuGen supports the resizing of windows during recording the session, we recommend that you do not move or resize them while recording. To change the size or position of a window, double-click on the
relevant Sync on Window step in the script’s Tree view and modify the window’s coordinates.

Make Sure Resolution Settings are Consistent
To insure successful bitmap synchronization, make sure that the resolution settings match. On the recording machine, check the settings of the ICA client, the Recording Options, and the Run Time settings. On the load
 generators, check the settings of the ICA client, and make sure that they are consistent between all load generators and recording machines. If there is an inconsistency between the resolutions, the server traffic increases in order to make the necessary adjustments.

Add Manual Synchronization Points
While waiting for an event during recording, such as the opening of an application, we recommend that you add manual synchronization points, such as Sync on Bitmap or Sync on Text. 

Disable Client Updates
Disable client updates when prompted by the Citrix client. This will prevent forward compatibility issues between VuGen and newer Citrix clients that were not yet tested.

Windows Style
For Sync on Bitmap steps, record windows in the "classic" windows style not the XP style.

To change the Windows style to "classic":
1 Click in the desktop area.
2 Select Properties from the right-click menu.
3 Select the Theme tab.
4 Select Windows Classic from the Theme drop down list.
5 Click OK.