Friday 26 July 2013

Stress Testing

Stress Tests determine the load under which a system fails, and how it fails. This is in contrast to Load Testing, which attempts to simulate anticipated load. It is important to know in advance if a ‘stress’ situation will result in a catastrophic system failure, or if everything just “goes really slow”

 There are various varieties of Stress Tests, including spike, stepped and gradual ramp-up tests. Catastrophic failures require restarting various infrastructure and contribute to downtime, a stress-full environment for support staff and managers, as well as possible financial losses. If a major performance bottleneck is reached, then the system performance will usually degrade to a point that is unsatisfactory, but performance should return to normal when the excessive load is removed.


Before conducting a Stress Test, it is usually advisable to conduct targeted infrastructure tests on each of the key components in the system. A variation on targeted infrastructure tests would be to execute each one as a mini stress test.

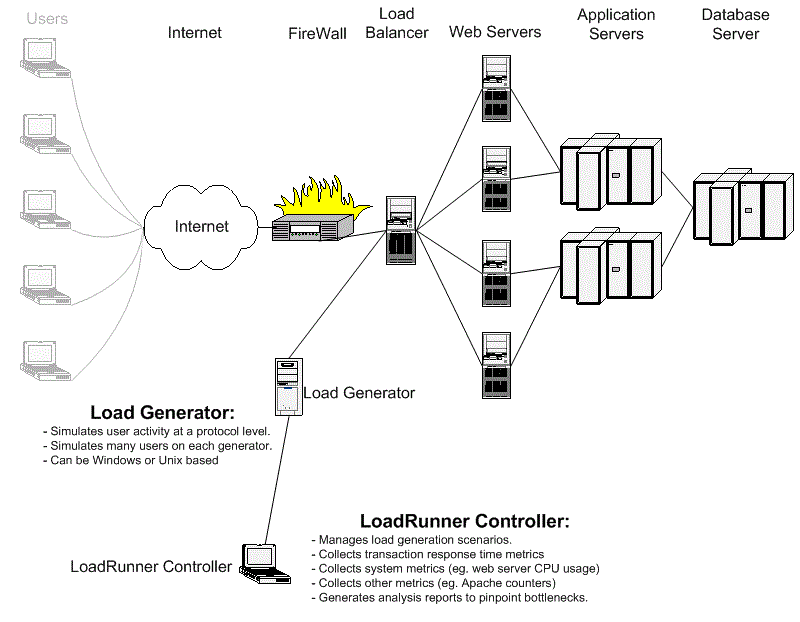
The diagram below shows an unexpectedly high amount of demand on a typical web system. Stress situations are not expected under normal circumstances.

The following table lists possible situations for a variety of applications where stress situations may occur.
Type of ApplicationCircumstances that could give rise to Stress levels of activity.
Online Banking
After an outage - when many clients have been waiting for access to the application to do their banking transactions.
Marketing / Sales Application
Very successful advertising campaign - or substantial error in advertising campaign that understates pricing details.
Various applications
Unexpected publicity - for example, in a news article in a national online newspaper.


Focus of stress test.


In a stress event, it is most likely that many more connections will be requested per minute than under normal levels of expected peak activity. In many stress situations, the actions of each connected user will not be typical of actions observed under normal operating conditions. This is partly due to the slow response and partly due to the root cause of the stress event.

Lets take an example of a large holiday resort web site. Normal activity will be characterized by browsing, room searches and bookings. If a national online news service posted a sensational article about the resort and included a URL in the article, then the site may be subjected to a huge number of hits, but most of the visits would probably be a quick browse. It is unlikely that many of the additional visitors would search for rooms and it would be even less likely that they would make bookings. However, if instead of a news article, a national newspaper advertisement erroneously understated the price of accommodation, then there may well be an influx of visitors who clamour to book a room, only to find that the price did not match their expectations.

In both of the above situations, the normal traffic would be increased with traffic of a different usage profile. So a stress test design would incorporate a Load Test as well as additional virtual users running a special series of 'stress' navigations and transactions.

For the sake of simplicity, one can just increase the number of users using the business processes and functions coded in the Load Test. However, one must then keep in mind that a system failure with that type of activity may be different to the type of failure that may occur if a special series of 'stress' navigations were utilized for stress testing.
Stress test execution.

Typically, a stress test starts with a Load Test, and then additional activity is gradually increased until something breaks. An alternative type of stress test is a Load Test with sudden bursts of additional activity. The sudden bursts of activity generate substantial activity as sessions and connections are established, where as a gradual ramp-up in activity pushes various values past fixed system limitations.


Ideally, stress tests should incorporate two runs, one with burst type activity and the other with gradual ramp-up as per the diagram above, to ensure that the system under test will not fail catastrophically under excessive load. System reliability under severe load should not be negotiable and stress testing will identify reliability issues that arise under severe levels of load.

An alternative, or supplemental stress test is commonly referred to as a spike test, where a single short burst of concurrent activity is applied to a system. Such tests are typical of simulating extreme activity where a 'count-down' situation exists. For example, a system that will not take orders for a new product until a particular date and time. If demand is very strong, then many users will be poised to use the system the moment the count down ends, creating a spike of concurrent requests and load.

What is Endurance Testing?

Endurance  testing is running a system at high levels of load for prolonged periods of time. A soak test would normally execute several times more transactions in an entire day (or night) than would be expected in a busy day, to identify any performance problems that appear after a large number of transactions have been executed.

Also, it is possible that a system may ‘stop’ working after a certain number of transactions have been processed due to memory leaks or other defects. Soak tests provide an opportunity to identify such defects, whereas load tests and stress tests may not find such problems due to their relatively short duration.


The above diagram shows activity for a certain type of site. Each login results in an average session of 12 minutes duration with and average eight business transactions per session.

A soak test would run for as long as possible, given the limitations of the testing situation. For example, weekends are often an opportune time for a soak test. Soak testing for this application would be at a level of 550 logins per hour, using typical activity for each login.

The average number of logins per day in this example is 4,384 per day, but it would only take 8 hours at 550 per hour to run an entire days activity through the system.

By Starting a 60 hour soak test on Friday evening at 6 pm (to finish at 6am Monday morning), 33,000 logins would be put through the system, representing 7½ days of activity. Only with such a test, will it be possible to observe any degradation of performance under controlled conditions. 

Some typical problems identified during soak tests are listed below:
Serious memory leaks that would eventually result in a memory crisis, Failure to close connections between tiers of a multi-tiered system under some circumstances which could stall some or all modules of the system. 

Failure to close database cursors under some conditions which would eventually result in the entire system stalling. Gradual degradation of response time of some functions as internal data-structures become less efficient during a long test.

Apart from monitoring response time, it is also important to measure CPU usage and available memory. If a server process needs to be available for the application to operate, it is often worthwhile to record it's memory usage at the start and end of a soak test. It is also important to monitor internal memory usages of facilities such as Java Virtual Machines, if applicable.

Long Session Soak Testing
When an application is used for long periods of time each day, the above approach should be modified, because the soak test driver is not Logins and transactions per day, but transactions per active user for each user each day.

This type of situation occurs in internal systems, such as ERP and CRM systems, where users login and stay logged in for many hours, executing a number of business transactions during that time. A soak test for such a system should emulate multiple days of activity in a compacted time-frame rather than just pump multiple days worth of transactions through the system.

Long session soak tests should run with realistic user concurrency, but the focus should be on the number of transactions processed. VUGen scripts used in long session soak testing may need to be more sophisticated than short session scripts, as they must be capable of running a long series of business transactions over a prolonged period of time.
Test Duration

The duration of most soak tests is often determined by the available time in the test lab. There are many applications, however, that require extremely long soak tests. Any application that must run, uninterrupted for extended periods of time, may need a soak test to cover all of the activity for a period of time that is agreed to by the stakeholders, such as a month. Most systems have a regular maintenance window, and the time between such windows is usually a key driver for determining the scope of a soak test.

A classic example of a system that requires extensive soak testing is an air traffic control system. A soak test for such a system may have a multi-week or even multi-month duration.

Failover Test

Failover Tests verify of redundancy mechanisms while the system is under load. This is in contrast to Load Tests which are conducted under anticipated load with no component failure during the course of a test.

For example, in a web environment, failover testing determines what will happen if multiple web servers are being used under peak anticipated load, and one of them dies.

Does the load balancer react quickly enough?


Can the other web servers handle the sudden dumping of extra load?

Failover testing allows technicians to address problems in advance, in the comfort of a testing situation, rather than in the heat of a production outage. It also provides a baseline of failover capability so that a 'sick' server can be shutdown with confidence, in the knowledge that the remaining infrastructure will cope with the surge of failover load.
Explanatory Diagrams:

The following is a configuration where failover testing would be required.


This is just one of many failover configurations. Some failover configurations can be quite complex, especially when there are redundant sites as well as redundant equipment and communications lines.

In this type of configuration, when one of the application servers goes down, then the two web servers that were configured to communicate with the failed application server can not take load from the load balancer, and all of the load must be passed to the remaining two web servers. See diagram below:


When such a failover event occurs, the web servers are under substantial stress, as they need to quickly accommodate the failed over load, which probably will result in doubling the number of HTTP connections as well as application server connections in a very short amount of time. The remaining application server will also be subjected to severe increase in load and the overheads associated with catering for the increased load.

It is crucial to the design of any meaningful failover testing that the failover design is understood, so that the implications of a failover event, while under load can, be scrutinized.
Fail-back Testing:

After verifying that a system can sustain a component outage, it is also important to verify that when the component is back up, that it is available to take load again, and that it can sustain the influx of activity when it comes back online.


Load Test In Load Runner

Load Tests are end to end performance tests under anticipated production load. The objective such tests are to determine the response times for various time critical transactions and business processes and ensure that they are within documented expectations (or Service Level Agreements - SLAs). Load tests also measures the capability of an application to function correctly under load, by measuring transaction pass/fail/error rates. An important variation of the load test is the Network Sensitivity Test, which incorporates WAN segments into a load test as most applications are deployed beyond a single LAN.

Load Tests are major tests, requiring substantial input from the business, so that anticipated activity can be accurately simulated in a test environment. If the project has a pilot in production then logs from the pilot can be used to generate ‘usage profiles’ that can be used as part of the testing process, and can even be used to ‘drive’ large portions of the Load Test.

Load testing must be executed on “today’s” production size database, and optionally with a “projected” database. If some database tables will be much larger in some months time, then Load testing should also be conducted against a projected database. It is important that such tests are repeatable, and give the same results for identical runs. They may need to be executed several times in the first year of wide scale deployment, to ensure that new releases and changes in database size do not push response times beyond prescribed SLAs.

What is the purpose of a Load Test?


The purpose of any load test should be clearly understood and documented. A load test usually fits into one of the following categories:
Quantification of risk. - Determine, through formal testing, the likelihood that system performance will meet the formal stated performance expectations of stakeholders, such as response time requirements under given levels of load. This is a traditional Quality Assurance (QA) type test. Note that load testing does not mitigate risk directly, but through identification and quantification of risk, presents tuning opportunities and an impetus for remediation that will mitigate risk.
Determination of minimum configuration. - Determine, through formal testing, the minimum configuration that will allow the system to meet the formal stated performance expectations of stakeholders - so that extraneous hardware, software and the associated cost of ownership can be minimized. This is a Business Technology Optimization (BTO) type test.


What functions or business processes should be tested?


The following table describes the criteria for determining the business functions or processes to be included in a test.
Basis for inclusion in Load Test Comment

High frequency transactions

The most frequently used transactions have the potential to impact the performance of all of the other transactions if they are not efficient.

Mission Critical transactions

The more important transactions that facilitate the core objectives of the system should be included, as failure under load of these transactions has, by definition, the greatest impact.


Read Transactions

At least one READ ONLY transaction should be included, so that performance of such transactions can be differentiated from other more complex transactions.

Update Transactions 

At least one update transaction should be included so that performance of such transactions can be differentiated from other transactions.

Example of Load Test Configuration for a web system

The following diagram shows how a thorough load test could be set up using LoadRunner.

The important thing to understand in executing such a load test is that the load is generated at a protocol level, by the load generators, that are running scripts developed with the VUGen tool. Transaction times derived from the VUGen scripts do not include processing time on the client PC, such as rendering (drawing parts of the screen) or execution of client side scripts such as JavaScript. The WinRunner PC(s) is utilized to measure end user experience response times. Most load tests would not employ a WinRunner PC to measure actual response times from the client perspective, but is highly recommended where complex and variable processing is performed on the desktop after data has been delivered to the client.

The LoadRunner controller is capable of displaying real-time graphs of response times as well as other measures such as CPU utilization on each of the components behind the firewall. Internal measures from products such as Oracle, WebSphere are also available for monitoring during test execution.

After completion of a test, the Analysis engine can generate a number of graphs and correlations to help locate any performance bottlenecks.

Simplified Load Test Configuration for a web system
In this simplified load test, the controller communicates directly to a load generator that can communicate directly to the load balancer. No WinRunner PC is utilized to measure actual user experience. The collection of statistics from various components is simplified as there is no firewall between the controller and the web components being measured.
Reporting on Response Time at various levels of load.

Expected output from a load test often includes a series of response time measures at various levels of load, eg 500 users, 750 users and 1,000 users. It is important when determining the response time at any particular level of load, that the system has run in a stable manner for a significant amount of time before taking measurements.

For example, a ramp-up to 500 users may take ten minutes, but another ten minutes may be required to let the system activity stabilize. Taking measurements over the next ten minutes would then give a meaningful result. The next measurement can be taken after ramping up to the next level and waiting a further ten minutes for stabilization and ten minutes for the measurement period and so on for each level of load requiring detailed response time measures.


Stating Response Time Requirements

Traditionally, response time is often defined as the interval from when a user initiates a request to the instant at which the first part of the response is received at by the application. However, such a definition is not usually appropriate within a performance related application requirement specification. The definition of response time must incorporate the behavior, design and architecture of the system under test. While understanding the concept of response time is critical in all load and performance tests, it is probably most crucial to Load Testing,Performance Testing and Network Sensitivity Testing.

Response time measuring points must be carefully considered because in client server applications, as well as web systems, the first characters returned to the application often does not contribute to the rendering of the screen with the anticipated response, and do not represent the users impression of response time.

For example response time in a web based booking system, that contains a banner advertising mechanism, may or may not include the time taken to download and display banner adds, depending on your interest in the project. If you are a marketing firm, you would be very interested in banner add display time, but if you were primarily interested in the booking component, then banner adds would not be of much concern.

Also, response time measurements are typically defined at the communications layer, which is very convenient for LoadRunner / VUGen based tests, but may be quite different to what a user experiences on his or her screen. A user sees what is drawn on a screen and does not see the data transmitted down the communications line. The display is updated after the computations for rendering the screen have been performed, and those computations may be very sophisticated and take a considerable amount of time. For response time requirements that are stated in terms of what the user sees on the screen, WinRunner should be used, unless there is a reliable mathematical calculation to translate communications based response time into screen based response time.

It is important that response time is clearly defined, and the response time requirements (or expectations) are stated in such a way to ensure that unacceptable performance is flagged in the load and performance testing process.

One simple suggestion is to state an Average and a 90th Percentile response time for each group of transactions that are time critical. In a set of 100 values that are sorted from best to worst, the 90th percentile simply means the 90th value in the list. The specification is as follows:
Time to display order details
Average time to display order details.
less than 5.0 seconds.
90th percentile time to display order details.
less than 7.0 seconds.

The above specification, or response time service level agreement, is a reasonably tight specification that is easy to validate against.

For example, a customer 'display order details' transaction was executed 20 times under similar conditions, with response times in seconds, sorted from best to worst, as follows -

2,2,2,2,2, 2,2,2,2,2, 3,3,3,3,3, 4,10,10,10,20 Average = 4.45 seconds, 90th Percentile = 10 seconds

The above test would fail when compared against the above stated criteria, as too many transactions were slower than seven seconds, even though the average was less than five seconds.

If the performance requirement was a simple "Average must be less than five seconds" then the test would pass, even though every fifth transaction was ten seconds or slower.

This simple approach can easily extended to include 99th percentile and other percentiles as required for even tighter response time service level agreement specifications.

How to evaluate the response time of a Citrix application

Once LoadRunner establishes a connection with the Citrix server, we have two kinds of transactions, Outbound and Inbound. The first comprehending keystrokes and mouse gestures going from the client to the Citrix server. The second comprehend window commands and screen refreshes going from the Citrix server to the client.

Differently from other protocols, were we send a package (HTTP post, WebService call, etc) and wait for the response to measure the response time, the Citrix protocol does not have this kind synchronization. Basically what happens is, we send a keystroke for example, the server responds with a acknowledgment, and that’s it, there is no way of knowing if the applications has processed the request and presented the results. Basically, there is no synchronization between Inbound and Outbound transactions.

In order to measure the response times for Citrix transactions, we need to find a way to “understand” what is coming from the Citrix server and manually synchronize it. There are two ways of doing that, the first is to monitor for window changes, like a window opening, etc. The second is to monitor a part of the screen for a refresh. The problem with both of them is to predict what is going to change, like the name of window that is going open or which part of the screen will refresh. This makes the scripting part really difficult and time consuming, because we cannot predict exactly what is going to be changed, like for example, we’re monitoring for a screen change, but an error message appears, the script will understand that there was a change on the screen and continue, consequently crashing.

Another point to notice is that Citrix is a proprietary solution, based on a widely know protocol (RDP). RDP’s performance is based solely on the bandwidth capacities and being a proprietary solution, we cannot change the protocol, consequently, we cannot increase the performance of the protocol, we can only work with the bandwidth between the Citrix server and the client. This bandwidth varies too much from time to time (peak hours, etc), so the results will vary a lot depending on the time we run the tests.

Based on this assumption, in order to have reliable results, we need to run several rounds of tests during different times, so we can have an idea about the overall performance.

Assuming these problems, I tried to find different ways of getting the response times from Citrix applications. Based on a few articles on the subject, I found that there are more reliable ways of doing that, other than using LoadRunner scripts to capture response times.
Going back to the requirements, we can separate the measure of “response time” to do certain action into three steps. The first is the time it takes from sending a command from the client to the Citrix server. The second is the time the application takes to process that request. The third is the time it takes for Citrix to send the screen refresh with the results to the client. So:

Send Keystroke + Time to Process + Send Screen Refresh = Overall Response Time to Perform an Action

On most cases it is easy and reliable to measure the “time to process” each action locally, without Citrix, so what we need to measure is the time it takes for sending a keystroke to Citrix and the time it takes for the client to receive the screen refresh. Basically is the delay of sending a keystroke and the delay of receiving the screen.

We know that this delays are affected mainly by three factors, the bandwidth limitations, the latency and the amount of data transferred. The first step is to find out how much data is transferred. We can do that by two ways, one is to use a sniffer on the network to capture exactly how much data is sent and received on each transaction. The second is to estimate this amount based on known factors.
For the outbound transactions, this is quite easy, since mouse gestures and keystrokes usually consume the same bandwidth. For the inbound transactions we know that the RDP protocol uses JPG compression to send the screen refreshes, and it only sends the updates for the parts that were changed. This way we can estimate the amount of data transferred by using a simple formula to calculate the JPG size using the image size, density and color content of the refreshed areas.

Knowing the amount of data to be transferred on inbound and outbound transactions we have two options to know the delay. The first is to measure the Round Trip Time (RTT) from the Citrix to the client and the client to the Citrix server, using the amount of data estimated before. The second is to estimate the RTT with known formulas, that use this three factors to estimate the probable delay on the RTT.

After all this technical explanations, I believe that the best solution is to:
Measure the time to process each action locally, without Citrix.
Estimate the average amount of data transferred from the client to the Citrix server, using the standard values for keystrokes and mouse gestures.
Estimate the average amount of data transferred from the Citrix server to the client on the screen refreshes, using captures JPG images of the updates screens.
Measure the RTT with the estimated data for the outbound transactions on different times. This can be easily done by a network engineer once we know the amount of data.
Measure the RTT with the estimated data for the inbound transactions on different times.
Sum all this measures and define our average response time to execute an action over Citrix.

This way we have more reliable results, already on a fine grain, making it easier to identify problems, since we will know if the response times are high on the processing part or the Citrix part.

Note that we’re not trying to measure the Citrix server performance from a load perspective. There are known metrics for Citrix servers that usually satisfy the sizing requirements.

Configuring Sitescope and Weblogic Servers

LoadRunner doesn’t provide native interface to WebLogic 9 and 10 (only to 8.1FP4) and SiteScope just do it using RMI-IIOP.
So before configuring such monitor, is good to get the Dev/Infra team aware of the monitoring request. They need to check and enable RMI IIOP features inside weblogic.

On the WebLogic Server:


Before edit any field on Weblogic you need click in “Lock & Edit”. When you finish all configuration settings, it is necessary click in “Active Changes” to put changes in place.
Enable RMI-IIOP protocol:
At Domain’s Security section, check if “Anonymous Admin Lookup” is enabled
For the service/server you’re monitoring, at service’s Settings, Protocols, IIOP, enable IIOP and in advanced configuration, set up IIOPUserName and IIOPPassword to weblogic’s admin credentials

Maybe a restart will be required

On the JMX Client

Make sure you will be running a JAVA VM at version 1.5 or above.
When activating the JMX client (jconsole, for example) add the following parameter:

-J-Dcom.sun.CORBA.transport.ORBTCPReadTimeouts=10:60000:500:10
This will change the timeouts for the CORBA protocol (remember we’re getting JMX from a WebLogic, so it goes thru RMI-IIOP)
Example:

H:\>jconsole -J-Dcom.sun.CORBA.transport.ORBTCPReadTimeouts=10:60000:500:10
Use the following URL pattern:

service:jmx:rmi:///jndi/iiop://YOURSERVERADDRESS:PORT/weblogic.management.mbeanservers.runtime
When asked for a Username and Password, give the RMI IIOPUsername/Password given in server configuration.

How to reset a terminal services session remotely

I forgot to log off after using a remote session through Terminal Services and then i get the beautiful ‘there are too many users connected’ error.

Probably this colleague already left for the day and you’re not able to contact him, so the best option here is to reset his session. In order to do this go to Command Prompt, and type:

qwinsta /server:xxx.xxx.xxx.xxx

xxx.xxx.xxx.xxx being your server IP address.

It should return a result table like this:
SESSIONNAME USERNAME ID STATE TYPE
console 0 Conn wdcon
rdp-tcp 65536 Listen rdpwd
rdp-tcp#8 Administrator 7 Active rdpwd
rdp-tcp#9 User 8 Active rdpwd

Choose the ID of the session that you would like to end and type:

rwinsta /server:xxx.xxx.xxx.xxx n

n being the session ID you want to reset.

How to script Oracle 11i Apps on LoadRunner

 If you’ve been on Performance Testing for a while, you should know that there are several ways of doing the same thing. Most examples were tested using LR 9.5 and Oracle 11i. I know that most tips can also be applied to LR 8.1, 9.1 and also Oracle 10.

Tip 1: How to correlate the Login?


Login is usually the tricky part of the Oracle Apps. The way I usually do is to use a multiple protocol script, HTTP and Oracle NCA. I know that the newer versions of LR have a specific protocol for Oracle Apps, but this has worked pretty well for me.

To make things easier, let’s record the steps from the web interface first. Don’t forget to add some comments, Each click on the web interface generates several requests and sometimes the same happens inside the application too.

All very simple so far. If you done the right things so far, LR should be capturing all events, both on the web interface and the Oracle interface. Once you’ve finished and LR generated the basic script, the tricky correlations come in.

On most cases, you will be using more than one application note. This means load balancing. In order to do this, the web front-end will send you a node name, port and domain.

To capture this information, use the following lines on the first request made when selected a form. Right before the “RF.jsp” call.

web_reg_save_param("serv_name", "LB=var xsname = \"", "RB=\"", LAST);
web_reg_save_param("port_num", "LB=var xsport = \"", "RB=\"", LAST);
web_reg_save_param("domain_name", "LB=var xdname = \"", "RB=\"", LAST);

This will capture the required information for the load balancing. Now let’s concatenate this and create a connection string. Add this right after the “RF.jsp” call.

lr_save_string(lr_eval_string("{serv_name}{domain_name}"), "serv_name");

Now that we have the connection string, we need to capture some variables needed for the connection, like the form to be launched, some profile information, etc.

Right after the command above, add the following lines:

web_reg_save_param("nca_connect_1", "LB=

Using WSDL files to Create WebService Scripts

There are several ways of scripting this king of application, but today I’ll show how to use .NET WSDL files to create a simple script. Instead of pasting several images on the post I thought it would be more productive to record a screen cast. So here it is, the first video guide of this blog:


The steps are :
  1. Create a new single protocol script using the Web Service protocol.
  2. Click on the “Manage Services” button on the top left corner.
  3. Click on the “Import” button.
  4. Select URL and then paste your WSDL file URL Remember that it should include the “?WSDL” string at the end.
  5. Click on the “Import” button and then OK.
  6. Back to the script view, click on the “Add Service Call” button.
  7. Select the service you just added on the “Service” drop down list.
  8. Select the call you want to add on the “Operation” drop down list.
  9. At this point, you will see a list of parameters (Input and Output) on the middle box.
  10. The Input parameters are the parameters you will use on your request. On the opposite way, Output parameters are the parameters returned by the server.
  11. Some input parameters are required and some are optional. You will notice the difference on the “Include argument in call” checkbox.
  12. The required parameters have this checkbox disabled.
  13. With this checkbox you can add optional parameters to the request.
  14. You can also set the values you’ll be sending by filling the “Value” text box.
  15. You can save the returned parameters by selecting the desired parameter under “Output Arguments” and selecting the “Save returned value in parameter” checkbox.
  16. Once you’re done with the arguments selection, click on the OK button. This will add the request to the script.
  17. Once the code is created, you can replace parameters, add static arguments and all sorts of things that can only be done in LoadRunner.
  18. Returned values will be saved on the selected parameters to be used later, in case you have more than once call per script (sequential steps).

LoadRunner and IE8 INTERNET EXPLORER 8

Had this small problem today and I believe it would be interesting to share the solution. I was “forced” to update to Internet Explorer 8 (IE8) and for my surprise, VuGen crashes when trying to record anything with it.

My first thought was to check for patches. No patches, LoadRunner was already on version 9.52 (9.50 + 9.51 patch + 9.52 patch). Checking some forum posts I’ve found that the issue can be caused by the “Disable Execute Bit” (DEP) functionality. So how to disable it??

You have to open the boot.ini file (C:\boot.ini) and add the following string to your boot line:

/noexecute=alwaysoff

Usually it will become something like that:

multi(0)disk(0)rdisk(0)partition(1)\WINNT=”Microsoft Windows” /noexecute=alwaysoff /fastdetect

How to Change the TimeOut on LoadRunner

This is a very common issue when executing a scenario, meaning basically that the server has not responded in a specified amount of time. LoadRunner defaults to 120 seconds on all Web based protocols (HTTP, WebServices, Click & Script), but this can be easily changed using a command on the begging of the script, web_set_timeout.

The command have only two parameters, the operation and the new value. The operation can be one of these three:

CONNECT: To establish the connection to the Web server.
RECEIVE: Time–out on the next “portion” of server response to arrive.
STEP: Time–out on each VuGen step.

Usually the one we see expiring the most is STEP, for obvious reasons. The error message should look something like “Step Download Timeout”.

The second parameter is the new value, expressed in seconds. So if we want to set up a new value for STEP we have to insert this code in the beginning of our action:

web_set_timeout("STEP","240");
Being 240 seconds our new value.

Usually I change the timeout value of all three operations, just to be sure:

web_set_timeout("STEP","240");
web_set_timeout("CONNECT","240");
web_set_timeout("RECEIVE","240");

We just have to be careful when changing this configuration, because the default value is already too high for most user actions.
This should only be used in two cases:
When we really expect a transaction to be slow, like a large report or file upload, something that the users already expect to be slow;
Also when we need to troubleshoot a slow transaction, meaning, waiting for a longer period to get the response.

How to Obtain an ICA File Through Citrix Web Interface 4.5 and 4.6

In Web Interface versions earlier than 4.5, you can obtain the ICA file contents using Internet Explorer by using the Save Target As… option when using a link in the applications page (or a similar operation in other Web browsers). When using Web Interface 4.5 or later, this operation no longer results in the ICA file being downloaded.

Procedure
For Web Interface 4.5:
Complete the following procedure:

When using an unsecured transport mechanism (HTTP):

Change the file type association property. To do so:

Open Windows Explorer.

From the Tools menu, click Folder options…

Select the File Types tab.

Select the ICA / Citrix ICA Client extension.

Click Advanced and select the Confirm open after download check box.

Click OK and then click Close.

Once this is done, each time the application launch is attempted (by clicking the application launch link), a dialogue displays asking if you want to open or save the ICA file. Clicking Open launches the application. Clicking Save allows you to save the ICA file to the desired location.

When using a secure transport mechanism (HTTPS) with Internet Explorer:

When using a secure transport mechanism, the ActiveX control (ICO) is used to launch the application (this does not involve saving the ICA file), hence the file cannot be saved. However, changing some settings in Internet Explorer can modify this behaviour so that the ICA file is downloaded. To do this, configure Internet Explorer so that it does not trust the ActiveX control and therefore reverts to downloading the ICA file. Use the following procedure:
Go to Tools > Internet Options from the Internet Explorer menu.

Select the Security tab.

Click the Custom level… button to display the Security Settings dialog.

Ensure that File download is set to Enabled in the Downloadssection.

If the site is currently in the Trusted sites or Local intranet zone list, remove it (the site should be displayed in the Internet zone).

If you are using an operating system that has the Enhanced Internet Explorer Security Configuration enabled, this feature must be disabled (go to the Control Panel > Add or Remove Programs > Add/Remove Windows Components section).

Adjust the settings so that Internet Explorer can download files using the following procedure:

Once these changes have been made, follow the same operations as described in the HTTP section above.

For Web Interface 4.6:

Use a Firefox browser to enumerate the application icons. Right-Click and save the file to the desired location.

Edit the saved file in Notepad. Remove the “RemoveICAFile=yes” line so that the ICA file is not deleted from the desired location when the application is accessed.

-Or-

Use Web Interface 4.2 or an earlier version to create the desired ICA file.

Edit the saved file in Notepad. Remove the “RemoveICAFile=yes” line so that the ICA file is not deleted from the desired location when the application is accessed.

-Or-

If the server farm only contains Presentation Server 4.5 servers, use the Presentation Server Console from Presentation Server 4.0 (Note: Do not use this console to make other changes) and use the built-in feature to create the ICA file by right-clicking the published application. Else, use the Presentation Server Console as normal.

-Or-

Use Internet Explorer 6 or 7 (if asked to save as .aspx, save as .ica) and ensure the Web Interface site is accessed via the internet zone (e.g. by IP address or FQDN)

"Stop_time is 0" LoadRunner Analysis Error

It was not the first time I got this error message when trying to analyze results on LoadRunner Analysis. This is pretty strange since from the controller the test seemed to run fine. Usually I would just discard the test results and re-run it, just to avoid troubleshooting another problem caused by a LoadRunner bug that probably messed the results, but this time I decided to take some time to just check what was happened to the results.

When I tried to analyze raw results on Analysis, the import process fails and the error log has the following message:

Analysis Error log: <1 1:23:52="" pm="">
Error 75012: in file 25983.lrr the Stop_time is 0

This seems really strange, but first thing I tried was to open the .lrr file with a text editor. Searched for the Stop_time parameter and apparently it was missing. Start_time was there and apparently with the correct test start time. Let’s try to include Stop_time to the file and see what happens.

Both Start_time and Stop_time are Epoch, or UNIX time, which is pretty much seconds since 01-01-1970. Just to be sure, check your Start_time with a converter like . If the time is correct, do the math to check how many seconds your test ran. For example, 1 hour equals to 3600 seconds, 2 hours 7200 and so on.
Take this number and sum it with Start_time. Add a new parameter called Stop_time and use the result of your sum. Eg.:

Start_time=1325809089 // Fri, 06 Jan 2012 00:18:09 GMT
Stop_time=1325816289 // Fri, 06 Jan 2012 02:18:09 GMT

Saved the file and tried to open the results again and it worked

How to set up the WebLogic monitor

Installation Overview:

LoadRunner provides two different ways to monitor a WebLogic server depending upon the WebLogic version, i.e. SNMP-based monitor, or JMX monitor.
WebLogic Monitor (SNMP-based monitor)

WebLogic monitor (SNMP- based) gathers measurement based on information returned by the WebLogic SNMP agent.
Availability: LoadRunner 6.0
Supported Server Version: WebLogic 5.x
Supported Server Platform: Windows NT, Windows 2000

WebLogic Monitor (JMX monitor)

WebLogic monitor (JMX) gathers measurement based on Java API. It uses the JMX interface, (which is a Sun extension to Java.
Availability: LoadRunner7.02 or above
Supported Server Version: WebLogic 6.x –7.x. For WebLogic8.x,
Supported Server Platform: Windows NT, Windows 2000, Solaris 2.6, AIX 5.1, HP-UX 11
WebLogic Monitor (SNMP-based monitor)
Installation guide

The WebLogic (SNMP) monitor uses SNMP to retrieve server statistics. To use this monitor, you must make sure that a version prior to WebLogic 6.0 is installed on your server, and that the SNMP agent is installed and activated on the server.


How to start the Bea Web Server

1. Go to the WebLogic directory.

2. Save the startWebLogic.cmd file as startWebLogic.bat.

3. Open startWebLogic.bat and set the JDK_HOME parameter to .

4. Run startWebLogic.bat from the Command Prompt and wait a couple of minutes – if it starts OK, you will receive a “WebLogic started” notification.


How to start the SNMP agent on the server

1. Make sure that the standard SNMP agent is not running – to verify this, go to Control Panel ® Services and check the status of SNMP and SNMP Trap or consult the UNIX admin for the SNMP daemon on the Unix machine.

2. For the Windows platform, Open startSnmpAgent.cmd or startSnmpAgent.bat and set the JDK_HOME parameter to .

For the UNIX platform, the batch file is startSnmpAgent.sh.

3. In the same file (startSnmpAgent.bat or startSnmpAgent.sh), search for the following line (usually the last line in file):

“%JDK_HOME%\bin\java -classpath %JAVACLASSPATH% weblogic.SNMPAgent -password ServerSystemPassword -serverURLs t3://localhost:7001 -trapDestinations localhost:162”
This is the command use to startup the WebLogic SNMP agent.
It requires a Java Virtual Machine for execution.
The classpath must contain weblogicaaux.jar and \weblogic\classes. For Weblogic 5.1 with SP, you would need to add the sp jar file (usually named weblogic510spxxx.jar)to the CLASSPATH of the agent startup script.

4. Replace ServerSystemPassword with the password defined during server installation.

5. If you do not know your password, it is in the “weblogic.properties” file under the property “weblogic.password.system=???.”

6. You will probably need to change “localhost” to the name of your machine.

7. Run startSnmpAgent.bat from the Command Prompt. If it starts OK, you will receive a “Agent Initialization Complete” message.

NOTE:

1. For detailed instructions on installing the WebLogic SNMP agent and the utilities to test the agent, see http://www.weblogic.com/docs51/admindocs/snmpagent.html.

2. If you intend to run the WebLogic Server SNMP agent as the only agent on the system, you may not be able to start it if any other agent is already running and is bound to the SNMP port (161).
How to configure the SNMP-based monitor in LoadRunner

1. Click the WebLogic (SNMP) graph in the graph tree, and drag it into the right pane of the Run view.

2. Right-click the graph and choose Add Measurement(s), or choose Monitors à Add Online Measurement.

3. In the Monitored Server Machines section of the WebLogic (SNMP) ( or WebLogic) dialog box, click Add to enter the server name or IP address of the machine you want to monitor. Select the platform on which the machine runs, and click OK.

4. In the Resource Measurements section of the WebLogic (SNMP) dialog box, click Add to select the measurements that you want to monitor. The WebLogic SNMP Resources dialog box displays the available measurements.

5. Browse the WebLogic SNMP Objects tree.

6. To measure an object, select it, and click Add. The following tables describe the measurements and server properties that can be monitored
Known Issues and limitations

1. The SNMP-based monitor can only monitor up to 25 measurements.

2. Some network devices between the LoadRunner Controller machine and the SNMP agent machine might be configured to block or reroute the SNMP traffic.

Points to focus:


Q. LoadRunner 6.51 Controller crashes if the SNMP agent is unavailable


R. This is a known issue in LoadRunner 65 SP1. To resolve the issue, please download and apply Patch LR651P34 from Support’s Download à Patches à LoadRunner à 6.5 SP1 à LR651P34 – LoadRunner 6.51 Fixed Controller crashes caused by unavailability of the SNMP or WebLogic server
Q. How to monitor a non- Community String

R. To do so, please modify the snmp.cfg located in \dat\monitors:

1. Look for the appropriate monitor.

2. Uncomment the “SNMP_community_name=” line by removing the semi-colon (“;”).

3. Add the community string setup by the SNMP agent, to the end of “SNMP_community_name=;”. Please note that this is case-sensitive.

4. Save the snmp.cfg file and restart the LoadRunner Controller.


Q. How to change the port number

R. To do so, you need to modify the snmp.cfg file in \dat\monitors.

1. Look for the appropriate monitor.

2. Uncomment the “port=” line by removing the semi-colon (“;”).

3. Add the port number to the end of “port=”. For example, port=1234
Q. Error: “Not a scalar MIB object”

R. You receive this error because you are trying to access a private/ proprietary MIB file. LoadRunner does not recognize this file, as it is not in LoadRunner’s MIB definition file.
WebLogic Monitor (JMX monitor)
Installation Requirement

1. WebLogic 6.0 or above on the server

2. JDK 1.3.x or above installed on the Controller machine. For WebLogic8.x, you need JDK1.4.

3. Copy WebLogic.jar from \lib folder to \classes

4. LoadRunner 7.02 or above:

a. No patches is required for LoadRunner 7.5 or above

b. For LoadRunner 7.02:
Contact Mercury Customer Support for patch LR702P34 – LoadRunner 7.02 WebLogic JMX monitor for versions 6.0 & 6.1
To install:

i. Exit LoadRunner Controller.

ii. Unzip weblogic60_702.zip in the LoadRunner installation directory.

iii. Terminate the Java Web server by entering the URL

http://localhost:1112/?id=exit&type=0 in a browser.

iv. Run patch_monitors_v702.bat in \bin

v. Install Java Runtime by executing j2re-1_3_1-win.exe.
How to configure the WebLogic (JMX) Monitor in LoadRunner

1. Click the WebLogic (JMX) graph in the graph tree, and drag it into the right pane of the Run view.

2. Right-click the graph and choose Add Measurement(s), or choose Monitors à Add Online Measurement.

3. In the Monitored Server Machines section of the WebLogic (JMX) dialog box, click Add to enter the server name or IP address of the machine you want to monitor. Enter the server name or IP address according to the following format:

:

For example: mercury:8111. Select the platform on which the machine runs, and click OK.

4. Click Add in the Resource Measurements section of the WebLogic (JMX) dialog box. In the Enter Login Information dialog box, enter the username and password of a user with administrative privileges to the WebLogic server. The BEA WebLogic Monitor Configurationdialog box opens. For details on creating user permissions, see

5. Browse the Measured Components tree.

6. Check the required performance counters in the BEA WebLogic Monitor Configuration window’s right pane.

7. Click OK in the BEA WebLogic Monitor Configuration dialog box, and in the WebLogic (JMX) dialog box, to activate the WebLogic (JMX) monitor.
How to Monitor WebLogic8.x

LoadRunner 7.x and 8.x does not support monitoring against WebLogic8.x out of the box. In order to Monitor WebLogic8.x:

1. Go to \classes and rename the file jmxri.jar to something else.

2. Go to \dat\monitors and edit the weblogicmon.ini:

a. Set the JVM to point to JDK1.4

b. Comment out the JavaVersion entry if there is a complain about JDK versions

c. DO NOT comment out the reference to jmxri.jar in this file It must remain as shown below:

JVM_CLASSES1=jmxri.jar

3. Copy the weblogic.jar from the server to the \classes directory.

4. In WebLogic 8.x server console, do not setup administration port on SSL.

Known Issues and limitations

1. If the network connection between the monitored host (WebLogic server) and the LoadRunner Controller is slow, the monitor will not work. This is caused by a severe performance hit caused by using the JMX interface (which is a Sun extension to Java).

2. Some objects may not be present in the server after a restart. If you are monitoring objects like this, you must ensure they are created before restarting the monitoring program. Usually, activating some part of the Web application’s functionality creates these objects.

3. WebLogic contains a large number of counters. In the simple Pet Store Demo alone, there are over 1400 of them. If you add all the counters, it will cause the LoadRunner to freeze for a very long time (10-30 minutes) while it adds the information to the GUI.

4. NOTE: When troubleshooting JMX issues, make sure that you shut down the LoadRunner side Web server (killing the javaw.exe in the process list) after any changes you make. Else, the changes won’t take effect.

Tips and tricks:

Q. What is the limit on the number of metrics that can be monitored


R. There is no limit on the number of metrics for JMX monitor. However, if you add a large number of counters, it will cause LoadRunner to freeze for a long time while it adds the information to the GUI.


Q. Application (Controller or MonintorClient) disappears when user select “Add Measurement” for JMX monitor in LoadRunner7.5.

R. This is a known issue in LR 7.5 only. Please contact Mercury Customer Support for LR75P1 – LoadRunner 7.5 Fix WebLogic JMX monitor dialog crash. This issue was addressed after LR 7.51


Q. Java Virtual Machine Version mismatch: Required version 1.3

R. If you do not have JVM installed, or have multiple versions of JVM installed, you will get this error. Please double check the installation. If you have multiple JVM,

1. Bring up \dat\monitors\WebLogicMon.ini

2. On the entry for JVM, set the full path to the correct java.exe. For example:

JVM=c:\jdk1.3\bin\java.exe

3. Make sure that the ‘JavaVersion=’ entry mention the correct JVM version.

Q. Parsing error. Details: host , port , line: . Reason: An Invalid character was found in text content.”

R. This is a known issue with platforms when there are European special characters returned from the server. Please contact Mercury Customer Support for the patch LR75P32 – LoadRunner 7.5 WebSphere, WebLogic JMX, EJB monitors don’t work with European special characters


Q. java.lang.ExceptionInInitializerError
R. You can get this error if JMX monitor does not have access to the ‘weblogic.jar’ file. To resolve the issue:

1. Copy the ‘weblogic.jar’ file from the server to the LoadRunner\classes folder on the controller machine.

2. Update the ‘CLASSPATH’ environment variable on the controller machine to include absolute path to LoadRunner\classes folder.

3. Go to Task Manager -> Processes tab and ensure that there is no ‘javaw.exe’ process running.

4. Launch the controller and try using the Weblogic JMX Monitor again.


Q. java.lang.exception: Failed to add host of type WebLogic. Reason: javax.naming.AuthenticationException (Root Exception is java.lang.SecurityException: User: Administrator, failed to be authenticated.
R. You get this error when the authentication information (username/password) provided for connecting to the WebLogic server is incorrect. Verify username/password and re-enter them with correct case.


Q. java.lang.Exception: Failed to add host of type WebLogic. Reason: java.lang.Exception: Unable to load WebLogic classes. CLASSPATH Servlet may not be running. Copy file weblogic.jar to \classes folder.

R. You can get this error if JMX monitor could not find WebLogic classes. To resolve the issue:
Go to Task Manager à Processes tab and ensure that there is no ‘javaw.exe’ process running.
Copy the ‘weblogic.jar’ file from the server to the < LoadRunner>\classes folder on the Controller machine.
Update the ‘CLASSPATH’ environment variable on the controller machine to include absolute path to < LoadRunner>\classes folder.
Launch the Controller and try using the WebLogic JMX Monitor again.


Q. java.lang.Exception: Failed to add host of type WebLogic. Reason: javax.naming.CommunicationException [Root exception is java.net.ConnectException: t3://machine_name: 7001: Destination unreachable; nested exception is: java.net.Connect Exception: Connection refused: connect; No available router to destination]
R. You can get this error if WebLogic is not running. Please make sure that you have started the WebLogic server
Q. Error: “javax.naming.ServiceUnavailableException [Root exception is java.net.UnknownHost Exception: XXXXXX]”
R. Make sure that host name entered for monitored server machines is correct. Try to ping and verify if the machine is available.


Q. Error: “java.lang.NoClassDefFoundError: javax/security/auth/callback/CallbackHandler.” Monitoring WebLogic 8.x with JDK 1.3

R. You need to use JDK 1.4 with Weblogic8.x. Refer to the next error if you have problem using JDK1.4.
Q. Error: “Java Virtual Machine Version Mismatch: Required version: 1.4.2; Sun Microsystems Inc”

R. If you are using JDK1.4.2, please comment out JavaVersion=1.3 from dat\monitors\WeblogicMon.ini by adding a semi-colon in front of the line.

EXAMPLE:

;JavaVersion=1.3


Q. Error: “org.xml.saxParseException: The root element is required in a well-formed document”

R. Set JVM entry to java.exe instead of javaw.exe

1. Go to \dat\monitors directory

2. Modify the JVM entry in weblogicmon.ini file to point to java.exe instead of javaw.exe.

Example:

[WebLogicMon]

JVM=C:\JDK1.3\bin\java.exe

Note: The java console will come up after changing javaw.exe to java.exe


Q.Error: “java.lang.OutOfMemory”

R. Increase the size of the JVM by editing the weblogicmon.ini file in \dat\monitors folder as shown below:

[WebLogicMon]

JVM=javaw.exe -Xms64M -Xmx256M

Or

[WebLogicMon]

JVM=java.exe -Xms64M -Xmx256M

This will set 64 MegaBytes as the memory allocated for the heap when the JVM starts.

And 256 MegaBytes as the maximum heap size the Java interpreter will use for dynamically allocated objects and arrays

WEBLOGIC MONITORING SCRIPT in WLST Tool

Web Logic Monitoring Script in WLST which would monitor JVM, Execute Queue, JDBC and JMS resources of all the Web Logic instances running in a domain. Please feel free to modify the script as necessary. 

WLST Script:

# WLST WebLogic Server Monitoring Script

username='wxyz'
password='******'
urldict={}
connect(username,password,'t3://kyarpt5q:9001')
serverlist=adminHome.getMBeansByType('Server')
for svr in serverlist:
urldict[svr.getName()]='t3://'+svr.getListenAddress()+':'+str(svr.getListenPort())
disconnect()

for svr,url in urldict.items():
try:
connect(username,password,url)
jvmrtlist=home.getMBeansByType('JVMRuntime')
print ' '
print ' '
print 'The Runtime Stats of Server: '+svr
print ' '
print 'JVM'
print ' '
print 'FreeJVM TotalJVM UsedJVM'
print ' '
for jvmRT in jvmrtlist:
freejvm = jvmRT.getAttribute("HeapFreeCurrent")
totaljvm = jvmRT.getAttribute("HeapSizeCurrent")
usedjvm = (totaljvm - freejvm)
print freejvm,' ',totaljvm,' ',usedjvm
print ' '


eqrtlist=home.getMBeansByType('ExecuteQueueRuntime')
print ' '
print ' '
print 'EXECUTE QUEUES'
print ' '
print 'ExecuteQueueName TotalCount CurrIdleCount PendRequestCurrCount ServicedRequestTotalCount'
print ' '
for eqRT in eqrtlist:
eqname = eqRT.getAttribute("Name")
eqtthreads = eqRT.getAttribute("ExecuteThreadTotalCount")
eqithreads = eqRT.getAttribute("ExecuteThreadCurrentIdleCount")
eqqc = eqRT.getAttribute("PendingRequestCurrentCount")
eqthrougp = eqRT.getAttribute("ServicedRequestTotalCount")
print eqname,' ',eqtthreads,' ',eqithreads,' ',eqqc,' ',eqthrougp
print ' '

poolrtlist=home.getMBeansByType('JDBCConnectionPoolRuntime')
print ' '
print ' '
print 'JDBC CONNECTION POOLS'
print ' '
print 'Name Maxcapacity ActiveCurrent ActiveHighCount WaitSecondsHighCount WaitingCurrentCount State'
print ' '
for poolRT in poolrtlist:
pname = poolRT.getName()
pmaxcapacity = poolRT.getAttribute("MaxCapacity")
paccc = poolRT.getAttribute("ActiveConnectionsCurrentCount")
pachc = poolRT.getAttribute("ActiveConnectionsHighCount")
pwshc = poolRT.getAttribute("WaitSecondsHighCount")
pwfccc = poolRT.getAttribute("WaitingForConnectionCurrentCount")
pstate = poolRT.getAttribute("State")
print pname,' ',pmaxcapacity,' ',paccc,' ',pachc,' ', pwshc,' ',pwfccc,' ',pstate
print ' '

jmsrtlist=home.getMBeansByType('JMSDestinationRuntime')
print ' '
print ' '
print 'JMS DESTINATIONS'
print ' '
print 'Name ByteCurr Pending Received High MsgCurr Pending High Received ConsumersTotal'
print ' '
for jmsRT in jmsrtlist:
jmsname = jmsRT.getAttribute("Name")
jmsbcc = jmsRT.getAttribute("BytesCurrentCount")
jmsbpc = jmsRT.getAttribute("BytesPendingCount")
jmsbrc = jmsRT.getAttribute("BytesReceivedCount")
jmsbhc = jmsRT.getAttribute("BytesHighCount")
jmsmcc = jmsRT.getAttribute("MessagesCurrentCount")
jmsmpc = jmsRT.getAttribute("MessagesPendingCount")
jmsmhc = jmsRT.getAttribute("MessagesHighCount")
jmsmrc = jmsRT.getAttribute("MessagesReceivedCount")
jmsctc = jmsRT.getAttribute("ConsumersTotalCount")
print jmsname,' ',jmsbcc,' ',jmsbpc,' ',jmsbrc,' ',jmsbhc,' ',jmsmcc,' ',jmsmpc,' ',jmsmhc,' ', jmsmrc,' ',jmsctc
print ' '

disconnect()
except:
print "Skipping "+svr
continue

Configuring WebLogic JMX on LoadRunner Controller


The WebLogic SNMP monitor is enable in the Controller as default. If you need to monitor Weblogic JMX, you have 2 options:

1.Use the SiteScope as a monitoring tool instead of Controller;
2.Enable the Weblogic JMX monitor into Controller.

To do this you will have to configure online_resource_graphs.rmd file – located under \dat\online_graphs: update the EnableInUi param of the relevant monitor (i.e. for WebLogic (JMX): search for the [WebLogicJMX] section and update its EnableInUi param).
Also, you might need to install java jdk on Controller (I didn’t have chance to test it):

WebLogic Monitor Requirements and Setup

Requirements
JDK 1.4 on controller
Permissions on WebLogic MBeans.

Setup on Controller:

After JDK installation Copy weblogic.jar from the lib folder of WebLogic Server to LoadRunner root\classes.
Remove jmxri.jar from LoadRunner root \classes.
Specify the path in the LoadRunner root folder\dat\monitors\WebLogicMon.ini file. Edit the JVM entry in the [WebLogicMon] section. For example: JVM=”E:\Program Files\JavaSoft\JRE\1.4\bin\javaw.exe
Edit the JavaVersion entry in the [WebLogicMon] section.

Set permissions on WebLogic
Open the WebLogic console (http:///console).
In the tree on the left, select Security > Realms > myrealm > Users, and click Configure a new User… in the screen on the right. The Create User: General tab opens.
In the Name box, type weblogic.admin.mbean, enter a password, confirm the password, and then click Apply.
In the Groups tab, enter the name of any user or group you want to use for monitoring, and then click Apply.

Web Logic Server Monitoring in LoadRunner using WLST


What is the WebLogic Scripting Tool?

The WebLogic Scripting Tool (WLST) is a command-line scripting interface that system administrators and operators use to monitor and manage WebLogic Server instances and domains. The WLST scripting environment is based on the Java scripting interpreter, Jython. In addition to WebLogic scripting functions, you can use common features of interpreted languages, including local variables, conditional variables, and flow control statements. WebLogic Server developers and administrators can extend the WebLogic scripting language to suit their environmental needs by following the Jython language syntax. See http://www.jython.org.
What Does WLST Do?

WLST lets you perform the following tasks:

Propagate a WebLogic Server domain to multiple destinations using predefined configuration and extension templates. See Creating and Configuring WebLogic Domains Using WLST Offline.
Retrieve domain configuration and runtime information. See Navigating and Interrogating MBeans.
Edit the domain configuration and persist the changes in the domain's configuration files. See Editing Configuration MBeans.
Edit custom, user-created MBeans and non-WebLogic Server MBeans, such as WebLogic Integration Server and WebLogic Portal Server MBeans. See Accessing Custom MBeans.
Automate domain configuration tasks and application deployment. See Automating WebLogic Server Administration Tasks.
Control and manage the server life cycle. See Managing Servers and Server Life Cycle.
Access the Node Manager and start, stop, and suspend server instances remotely or locally, without requiring the presence of a running Administration Server. See Using WLST and Node Manager to Manage Servers.

WLST functionality includes the capabilities of these WebLogic Server command-line utilities: the weblogic.Admin utility that you use to interrogate MBeans and configure a WebLogic Server instance (deprecated in this release of WebLogic Server), the wlconfig Ant task tool for making WebLogic Server configuration changes, and the weblogic.Deployer utility for deploying applications. For more information about these command-line utilities, see:
"Using Ant Tasks to Configure and Use a WebLogic Server Domain" in Developing Applications with WebLogic Server, describes using WebLogic Ant tasks for starting and stopping WebLogic Server instances and configuring WebLogic Server domains.
"Overview of Deployment Tools" in Deploying Applications to WebLogic Server, describes several tools that WebLogic Server provides for deploying applications and stand-alone modules.

You can create, configure, and manage domains using WLST, command-line utilities, and the Administration Console interchangeably. The method that you choose depends on whether you prefer using a graphical or command-line interface, and whether you can automate your tasks by using a script. See Script Mode.
How Does WLST Work?

You can use the scripting tool online (connected to a running Administration Server or Managed Server instance) and offline (not connected to a running server). For information on WLST online and offline commands, see WLST Online and Offline Command Summary.
Using WLST Online

Online, WLST provides simplified access to Managed Beans (MBeans), Java objects that provide a management interface for an underlying resource that you can manage through JMX. WLST is a JMX client; all the tasks you can do using WLST online, can also be done programmatically using JMX.

For information on using JMX to manage WebLogic Server resources, see Developing Custom Management Utilities with JMX.

When WLST is connected to an Administration Server instance, the scripting tool lets you navigate and interrogate MBeans, and supply configuration data to the server. When WLST is connected to a Managed Server instance, its functionality is limited to browsing the MBean hierarchy.

While you cannot use WLST to change the values of MBeans on Managed Servers, it is possible to use the Management APIs to do so. BEA Systems recommends that you change only the values of configuration MBeans on the Administration Server. Changing the values of MBeans on Managed Servers can lead to an inconsistent domain configuration.
Using WLST Offline

Using WLST offline, you can create a new domain or update an existing domain without connecting to a running WebLogic Server—supporting the same functionality as the Configuration Wizard.

Offline, WLST only provides access to persisted configuration information. You can create new configuration information, and retrieve and change existing configuration information that is persisted in the domain configuration files (located in the config directory, for example, config.xml) or in a domain template JAR created using Template Builder.

Note: Because WLST offline enables you to access and update the configuration objects that appear in the configuration files only, if you wish to view and/or change attribute values for a configuration object that is not already persisted in the configuration files as an XML element, you must first create the configuration object.


Modes of Operation

WLST is a command-line interpreter that interprets commands either interactively, supplied one-at-a-time from a command prompt, or in batches, supplied in a file (script), or embedded in your Java code. The modes of operation represent methods for issuing WLST commands:
Interactively, on the command line—Interactive Mode
In a text file—Script Mode
Embedded in Java code—Embedded Mode
Interactive Mode

Interactive mode, in which you enter a command and view the response at a command-line prompt, is useful for learning the tool, prototyping command syntax, and verifying configuration options before building a script. Using WLST interactively is particularly useful for getting immediate feedback after making a critical configuration change. The WLST scripting shell maintains a persistent connection with an instance of WebLogic Server. Because a persistent connection is maintained throughout the user session, you can capture multiple steps that are performed against the server. See Recording User Interactions.

In addition, each command that you enter for a WebLogic Server instance uses the same connection that has already been established, eliminating the need for user re-authentication and a separate JVM to execute the command.
Script Mode

Scripts invoke a sequence of WLST commands without requiring your input, much like a shell script. Scripts contain WLST commands in a text file with a .py file extension, for example, filename.py. You use script files with the Jython commands for running scripts. See Running Scripts.

Using WLST scripts, you can:
Automate WebLogic Server configuration and application deployment
Apply the same configuration settings, iteratively, across multiple nodes of a topology
Take advantage of scripting language features, such as loops, flow control constructs, conditional statements, and variable evaluations that are limited in interactive mode
Schedule scripts to run at various times
Automate repetitive tasks and complex procedures
Configure an application in a hands-free data center

In Listing 2-1, WLST connects to a running Administration Server instance, creates 10 Managed Servers and two clusters, and assigns the servers to a cluster.

Edit the script to contain the username, password, and URL of the Administration Server and start the server before running this script. See Running Scripts.

Listing 2-1 Creating a Clustered Domain
from java.util import *
from javax.management import *
import javax.management.Attribute

print 'starting the script .... '

connect('username','password','t3://localhost:7001')
clusters = "cluster1","cluster2"
ms1 = {'managed1':7701,'managed2':7702,'managed3':7703, 'managed4':7704, 'managed5':7705}
ms2 = {'managed6':7706,'managed7':7707,'managed8':7708, 'managed9':7709, 'managed10':7710}

clustHM = HashMap()
edit()
startEdit()

for c in clusters:
print 'creating cluster '+c
clu = create(c,'Cluster')
clustHM.put(c,clu)

cd('..\..')

clus1 = clustHM.get(clusters[0])
clus2 = clustHM.get(clusters[1])

for m, lp in ms1.items():
managedServer = create(m,'Server')
print 'creating managed server '+m
managedServer.setListenPort(lp)
managedServer.setCluster(clus1)

for m1, lp1 in ms2.items():
managedServer = create(m1,'Server')
print 'creating managed server '+m1
managedServer.setListenPort(lp1)
managedServer.setCluster(clus2)
save()
activate(block="true")
disconnect()
print 'End of script ...'
exit()

Embedded Mode


In embedded mode, you instantiate an instance of the WLST interpreter in your Java code and use it to run WLST commands and scripts. All WLST commands and variables that you use in interactive and script mode can be run in embedded mode.

Listing 2-2 illustrates how to instantiate an instance of the WLST interpreter and use it to connect to a running server, create two servers, and assign them to clusters.

Listing 2-2 Running WLST From a Java Class
package wlst;
import java.util.*;
import weblogic.management.scripting.utils.WLSTInterpreter;
import org.python.util.InteractiveInterpreter;

/**
* Simple embedded WLST example that will connect WLST to a running server,
* create two servers, and assign them to a newly created cluster and exit.
* Title: EmbeddedWLST.java

* Copyright: Copyright (c) 2004

* Company: BEA Systems

* @author Satya Ghattu (sghattu@bea.com)
*/

public class EmbeddedWLST
{
static InteractiveInterpreter interpreter = null;

EmbeddedWLST() {
interpreter = new WLSTInterpreter();
}

private static void connect() {
StringBuffer buffer = new StringBuffer();
buffer.append("connect('weblogic','weblogic')");
interpreter.exec(buffer.toString());
}

private static void createServers() {
StringBuffer buf = new StringBuffer();
buf.append(startTransaction());
buf.append("man1=create('msEmbedded1','Server')\n");
buf.append("man2=create('msEmbedded2','Server')\n");
buf.append("clus=create('clusterEmbedded','Cluster')\n");
buf.append("man1.setListenPort(8001)\n");
buf.append("man2.setListenPort(9001)\n");
buf.append("man1.setCluster(clus)\n");
buf.append("man2.setCluster(clus)\n");
buf.append(endTransaction());
buf.append("print `Script ran successfully ...' \n");
interpreter.exec(buf.toString());
}

private static String startTransaction() {
StringBuffer buf = new StringBuffer();
buf.append("edit()\n");
buf.append("startEdit()\n");
return buf.toString();
}

private static String endTransaction() {
StringBuffer buf = new StringBuffer();
buf.append("save()\n");
buf.append("activate(block='true')\n");
return buf.toString();
}

public static void main(String[] args) {
new EmbeddedWLST();
connect();
createServers();
}
}

Main Steps for Using WLST

The following sections summarize the steps for setting up and using WLST:
Setting Up Your Environment
Invoking WLST
Requirements for Entering WLST Commands
Running Scripts
Importing WLST as a Jython Module
Exiting WLST
Setting Up Your Environment

To set up your environment for WLST:

Install and configure the WebLogic Server software, as described in the WebLogic Server Installation Guide.

Add WebLogic Server classes to the CLASSPATH environment variable and WL_HOME\server\bin to the PATH environment variable, where WL_HOME refers to the top-level installation directory for WebLogic Server.

You can use a WL_HOME\server\bin\setWLSEnv script to set both variables.

On Windows, a shortcut on the Start menu sets the environment variables and invokes WLST (Tools—>WebLogic Scripting Tool).
Invoking WLST

Note: When invoking WLST from an Ant script, it is recommended that you fork a new JVM by specifying fork="true". This will ensure a clean environment and prevent the WLST exit command, which callsSystem.exit(0), from exiting the Ant script.

To invoke WLST:

If you will be connecting to a WebLogic Server instance through an SSL listen port on a server that is using the demonstration SSL keys and certificates, invoke WLST using the following command:

java -Dweblogic.security.SSL.ignoreHostnameVerification=true -Dweblogic.security.TrustKeyStore=DemoTrust weblogic.WLST

Otherwise, at a command prompt, enter the following command:

java weblogic.WLST

A welcome message and the WLST prompt appears:

wls:/(offline)>

To use WLST offline, enter commands, set variables, or run a script at the WLST prompt.

To use WLST online, start a WebLogic Server instance (see Starting and Stopping Servers) and connect WLST to the server using the connect command.

wls:/(offline)> connect('username','password','t3s://localhost:7002')
Connecting to weblogic server instance running at t3s://localhost:7002 as username weblogic ...
Successfully connected to Admin Server 'myserver' that belongs to domain 'mydomain'.

wls:/mydomain/serverConfig>

Note: BEA Systems strongly recommends that you connect WLST to the server through an SSL port or the administration port. If you do not, the following warning message is displayed:

Warning: An insecure protocol was used to connect to the server.
To ensure on-the-wire security, the SSL port or Admin port should be used instead.

Requirements for Entering WLST Commands

Follow these rules when entering WLST commands. Also see WLST Command and Variable Reference and WLST Online and Offline Command Summary.
Command names and arguments are case sensitive.
Enclose arguments in single or double quotes. For example, 'newServer' or "newServer".
If you specify a backslash character (\) in a string, for example when specifying a file pathname, you should precede the quoted string by r to instruct WLST to interpret the string in its raw form and ensure that the backslash is taken literally. This format represents standard Jython syntax. For example:
readTemplate(r'c:\mytemplate.jar')

When using WLST offline, the following characters are not valid in object names: period (.), forward slash (/), or backward slash (\).

If you need to cd to an object name that includes a forward slash (/) in its name, include the configuration object name in parentheses. For example:

cd('JMSQueue/(jms/REGISTRATION_MDB_QUEUE)')
Using WLST and a domain template, you can only create and access security information when you are creating a new domain. When you are updating a domain, you cannot access security information through WLST.

Running Scripts


WLST incorporates two Jython functions that support running scripts: java weblogic.WLST filePath.py, which invokes WLST and executes a script file in a single command, and execfile(filePath.py)which executes a script file after you invoke WLST.

To run the script examples in this guide, copy and save the commands in a text file with a .py file extension, for example, filename.py. Use the text file with the commands for running scripts that are listed below. There are sample scripts that you can use as a template when creating a script.py file from scratch.

If the script will connect WLST to a running server instance, start WebLogic Server before running the script.
Invoke WLST and Run a Script

The following command invokes WLST, executes the specified script, and exits the WLST scripting shell. To prevent exiting WLST, use the -i flag.

java weblogic.WLST filePath.py
java weblogic.WLST -i filePath.py

For example:


c:\>java weblogic.WLST c:/temp/example.py
Initializing WebLogic Scripting Tool (WLST) ...
starting the script ...
...
Run a Script From WLST

Use the following command to execute the specified script after invoking WLST.
execfile(filePath)


For example:

c:\>java weblogic.WLST
Initializing WebLogic Scripting Tool (WLST) ...
...
...
wls:/(offline)>execfile('c:/temp/example.py')
starting the script ...
...
Importing WLST as a Jython Module

Advanced users can import WLST from WebLogic Server as a Jython module. After importing WLST, you can use it with your other Jython modules and invoke Jython commands directly using Jython syntax.

The main steps include converting WLST definitions and method declarations to a .py file, importing the WLST file into your Jython modules, and referencing WLST from the imported file.

To import WLST as a Jython module:

Invoke WLST.

c:\>java weblogic.WLST
wls:/(offline)>

Use the writeIniFile command to convert WLST definitions and method declarations to a .py file.

wls:/(offline)> writeIniFile("wl.py")
The Ini file is successfully written to wl.py
wls:/(offline)>

Open a new command shell and invoke Jython directly by entering the following command:

c:\>java org.python.util.jython

The Jython package manager processes the JAR files in your classpath. The Jython prompt appears:

>>>

Import the WLST module into your Jython module using the Jython import command.

>>>import wl

Now you can use WLST methods in the module. For example, to connect WLST to a server instance:

wl.connect('username','password')
....

Note: When using WLST as a Jython module, in all WLST commands that have a block argument, block is always set to true, specifying that WLST will block user interaction until the command completes.
Exiting WLST

To exit WLST:
wls:/mydomain/serverConfig> exit()
Exiting WebLogic Scripting Tool ...
c:\>


Getting Help

To display information about WLST commands and variables, enter the help command.

If you specify the help command without arguments, WLST summarizes the command categories. To display information about a particular command, variable, or command category, specify its name as an argument to the help command. To list a summary of all online or offline commands from the command line using the following commands, respectively:
help('online')
help('offline')


The help command will support a query; for example, help('get*') displays the syntax and usage information for all commands that begin with get.

For example, to display information about the disconnect command, enter the following command:

wls:/mydomain/serverConfig> help('disconnect')

The command returns the following:

Description:
Disconnect from a weblogic server instance.

Syntax:
disconnect()

Example:
wls:/mydomain/serverConfig> disconnect()


Recording User Interactions

To start and stop the recording of all WLST command input, enter:

startRecording(recordFilePath,[recordAll])
stopRecording()

You must specify the file pathname for storing WLST commands when you enter the startRecording command. You can also optionally specify whether or not you want to capture all user interactions, or just the WLST commands; the recordAll argument defaults to false.

For example, to record WLST commands in the record.py file, enter the following command:

wls:/mydomain/serverConfig> startRecording('c:/myScripts/record.py')

For more information, see startRecording and stopRecording.


Redirecting WLST Output to a File

To start and stop redirecting WLST output to a file, enter:

redirect(outputFile,[toStdOut])
stopRedirect()

You must specify the pathname of the file to which you want to redirect WLST output. You can also optionally specify whether you want WLST output to be sent to stdout; the toStdOut argument defaults to true.

For example, to redirect WLST output to the logs/wlst.log file in the current directory and disable output from being sent to stdout, enter the following command:
wls:/mydomain/serverConfig> redirect('./logs/wlst.log', 'false')


For more information, see redirect and stopRedirect.


Converting an Existing Configuration into a WLST Script

To convert an existing server configuration (config directory) to an executable WLST script, enter:
configToScript([domainDir], [scriptPath], [overwrite], [propertiesFile], [deploymentScript])


You can optionally specify:
The domain directory that contains the configuration that you want to convert (defaults to ./config)
The path to the directory in which you want to write the converted WLST script (defaults to ./config/config.py)
Whether to overwrite the script if it already exists (defaults to true)
The path to the directory in which you want to store the properties file (defaults to pathname specified for scriptPath)
Whether to create a script that performs deployments only (defaults to false)

Note: configToScript() creates ancillary user-config and user-key files to hold encrypted attributes.

You can use the resulting script to re-create the resources on other servers. Before running the generated script, you should update the properties file to specify values that are appropriate for your environments. When you run the generated script:
If a server is currently running, WLST will try to connect using the values in the properties file and then run the script commands to create the server resources.
If no server is currently running, WLST will start a server with the values in the properties file, run the script commands to create the server resources, and shutdown the server. This may cause WLST to exit from the command shell.

For example, the following command creates a WLST script from the domain located at c:/bea/user_projects/domains/mydomain, and saves it to c:/bea/myscripts.

wls:/(offline)> configToScript('c:/bea/user_projects/domains/mydomain',
'c:/bea/myscripts')

For more information, see configToScript.


Customizing WLST

You can customize WLST using the WLST home directory, which is located at WL_HOME/common/wlst, by default, where WL_HOME refers to the top-level installation directory for WebLogic Server. All Python scripts that are defined within the WLST home directory are imported at WLST startup.

Note: You can customize the default WLST home directory by passing the following argument on the command line:
-Dweblogic.wlstHome=< >

The following table describes ways to customize WLST.


To define custom...
Do the following...
For a sample script, see...
WLST commands
Create a Python script defining the new commands and copy that file toWL_HOME/common/wlst.
WL_HOME/common/wlst/sample.py
Within this script, the wlstHomeSample() command is defined, which prints a String, as follows:
wls:/(offline)> wlstHomeSample()Sample wlst home command
WLST commands within a library
Create a Python script defining the new commands and copy that file toWL_HOME/common/wlst/lib.
The scripts located within this directory are imported as Jython libraries.
WL_HOME/common/wlst/lib/wlstLibSample.py
Within this script, the wlstHomeSample() command is defined, which prints a String, as follows:
wls:/(offline)> wlstLibSample.wlstExampleCommand()Example command
WLST commands as a Jython module
Create a Python script defining the new commands and copy that file toWL_HOME/common/wlst/modules.
This script can be imported into other Jython modules, as described inImporting WLST as a Jython Module.
WL_HOME/common/wlst/modules/wlstModule.py
A JAR file, jython.jar, containing all of the Jython modules that are available in Jython 2.1 is also available within this directory.